
- Name: Beautiful Watercolor
- Version: 1.6.24
- Author: dtbaker
- Created: 2016-01-12
- Last Updated: 2017-06-05
- Tested With: WordPress 4.8
- Download: Click Here
- Online Demo: Click Here
Live Backend Demo
Do you need to test out a theme feature in the admin backend? Need to see how the installer works before running it on your own website? Feel free to test everything here:

Theme Installation
Please watch this instructional video showing how to install this WordPress theme and setup default content:
Below are the step by step instructions:
- Purchase the theme from ThemeForest.net
- After purchasing go to your Downloads page ( http://themeforest.net/downloads )
- Click on the Download button and choose the Installable WordPress file option and save this ZIP file to your desktop.
- Login to WordPress Dashboard.
- Go to Appearance > Themes > Install Themes
- Click the Upload tab
- Choose the downloaded ZIP file from your desktop and click upload
- Choose the ‘Activate’ option after upload
- Follow the Setup Wizard prompts (see video for example)
- (if you need to run the setup wizard again please go to Appearance > Setup Wizard)
Here is a screenshot showing step by step instructions for downloading and installing the WordPress theme:

Child Theme Customizations (optional)
Sample Child Theme Available for download here: beautiful-watercolor-child.zip
- If you are familiar with WordPress theme customisations and you are planning on modifying this theme for your project then we highly recommend creating a “Child Theme” that contains your customisations.
- This way when an update is released by us it will not overwrite any of your custom changes.
- If you do not plan on editing any of the theme files (eg: css files, php code, background images) then you do not need to create a Child Theme.
- You do not have to create a Child Theme, this is an non-required advanced step for those who have a moderate level of website editing skills.
- Up to date instructions for creating a Child Theme are available here: http://codex.wordpress.org/Child_Themes#How_to_Create_a_Child_Theme
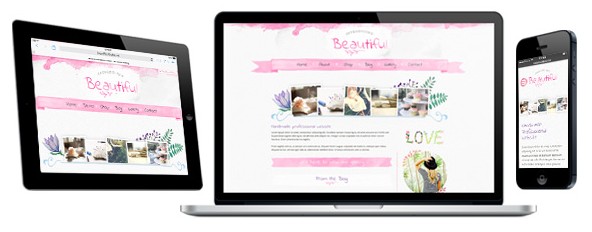
Responsive Layout
This theme is enabled with responsive CSS layouts so that it displays nicely on mobile devices. If you wish to disable this responsive feature please go to Appearance > Customize > Page Layout
Customizing Theme Colors, Fonts and Other Options
Customization is done easily via the Appearance > Customize menu. Here you can change colors and font styles for the ensite website, and preview them before they go live.
Most of the settings are under the “Typography” menu.
Advanced Customization: if you need assistance with advanced customizations then please hire someone from Envato Studio (look in the WordPress category)
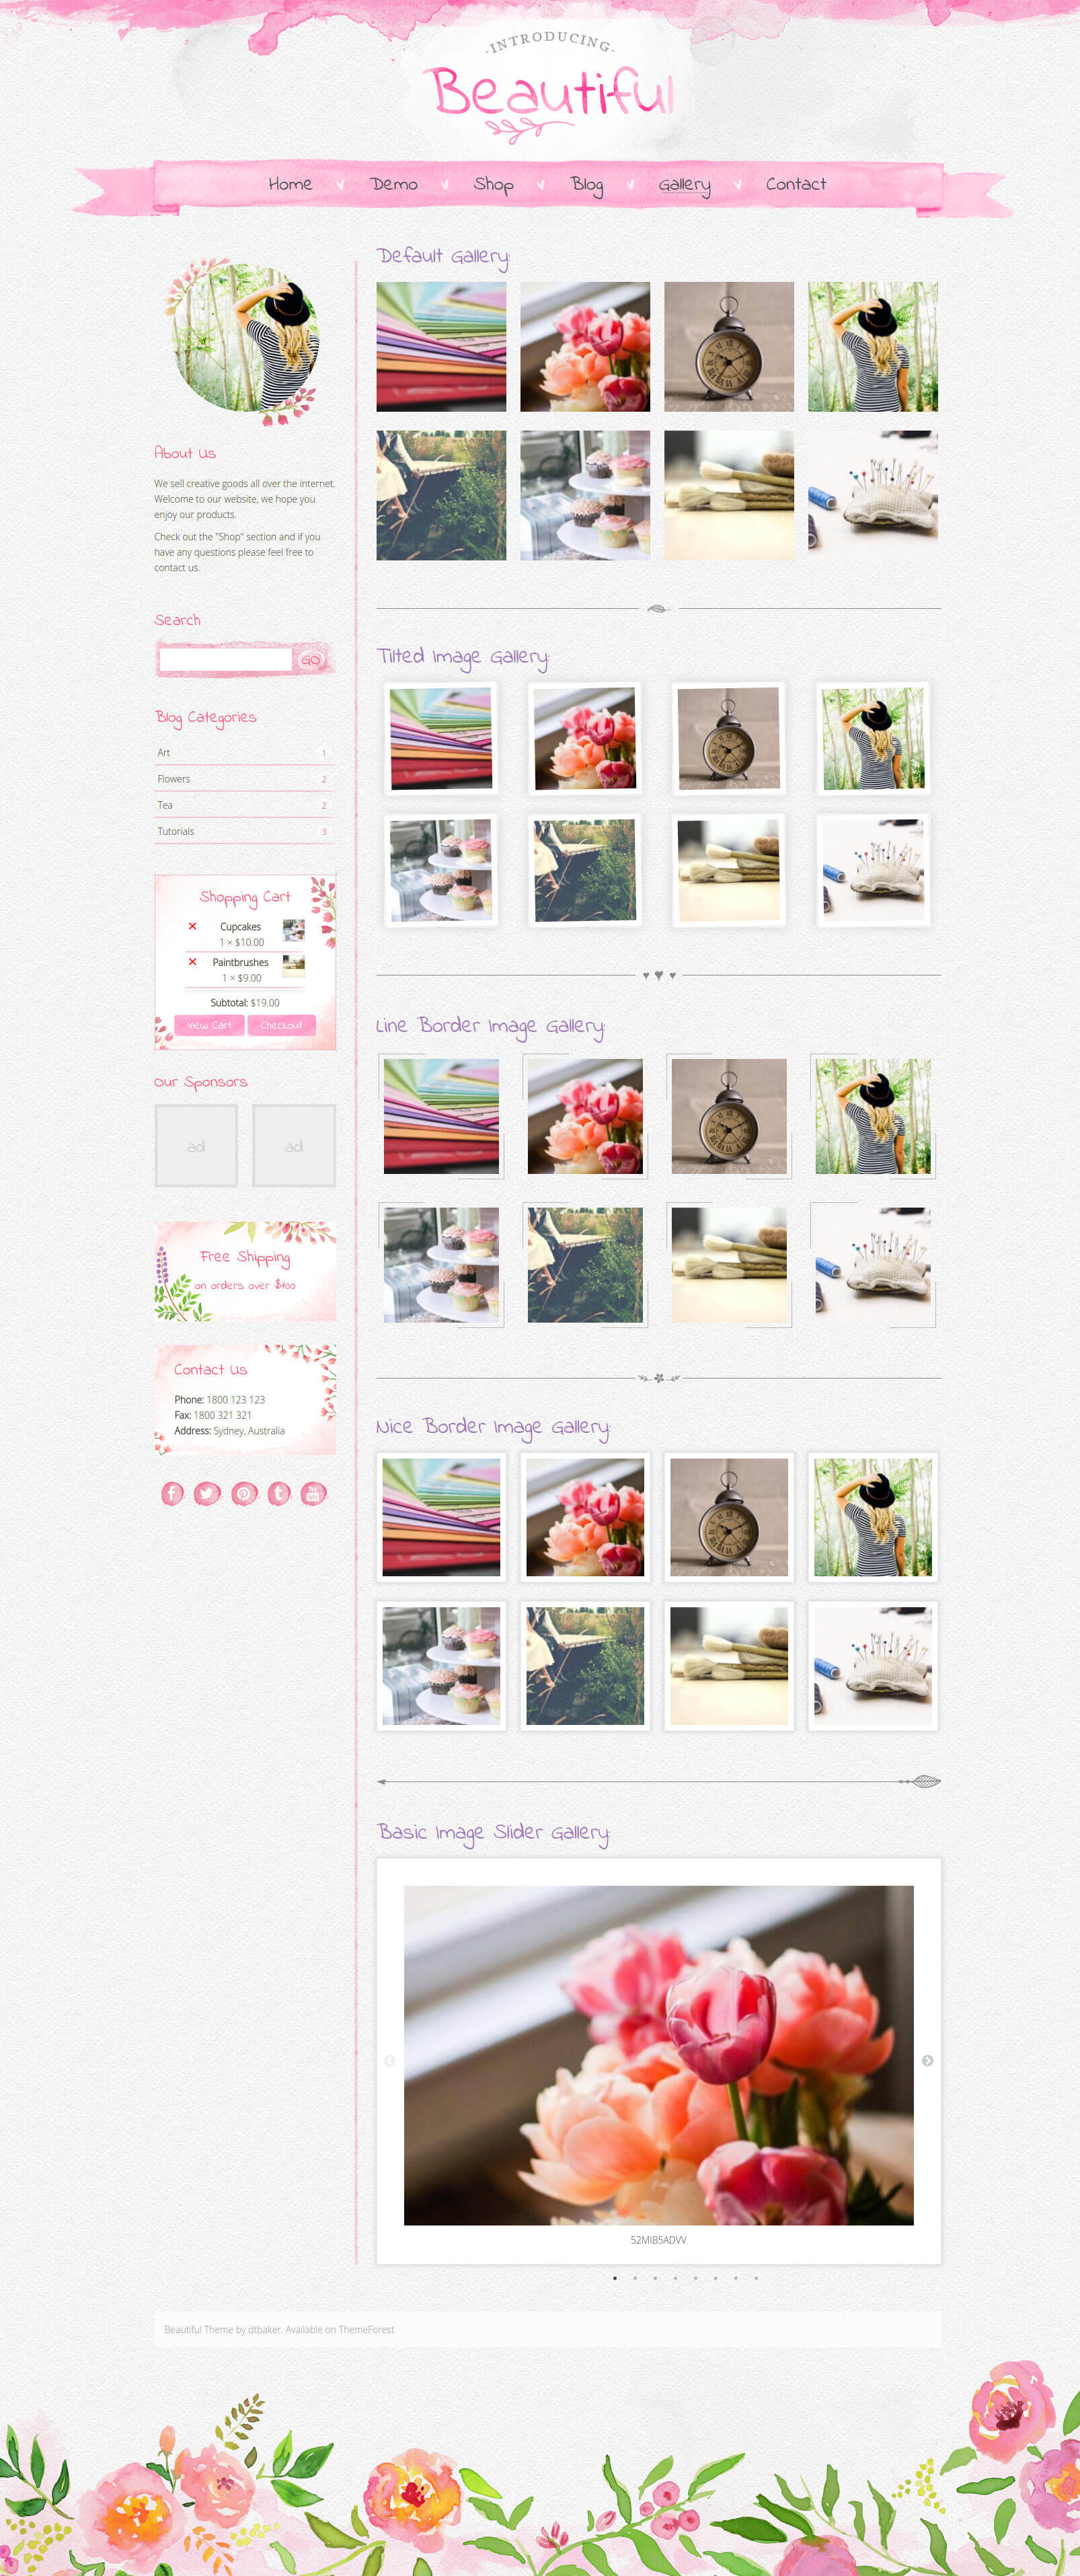
Create a photo gallery or simple image slider
Here are instructions on creating the fancy gallery with 3 images (as seen on the home page of the demo).
- Create a new page in WordPress
- Click the “Add Media” button at the top
- Choose “Create Gallery” on the left
- Select (or upload) your gallery images (the ideal image size is 160px by 140px)
- Click the “Create New Gallery” button
- Change “Link To” as “Media File”
- Change “Image Size” to “Thumbnail”
- Change the “Gallery Type” to one of the desired options.
- Click the “Insert Gallery” button
- Save the page and view it to check it works.
Setup the Contact Page
(not required if you have setup default content as above)
- Make sure the Contact Form 7 plugin is installed
- Login as admin and choose “Contacts” menu on the left.
- Open the default “Contact Form 1” and make any changes as neccessary.
- Copy the shortcode (it will look something like [[contact-form-7 title=”Contact form 1″]] )
- Create a new page called “Contact”, type the words “Please fill in the form below to contact us” and paste in the shortcode from before.
- Save the page and check the contact form works (ie: do you receive an email from it?)
- Click edit page again and add a map using the google map shortcode (more details below under shortcode)
Setup the Main Menu
(not required if you have setup default content as above)
Go to Appearance > Menu and follow the
standard WordPress menu creation process.
Detailed instructions on creating a menu are located on the WordPress
website here: http://codex.wordpress.org/WordPress_Menu_User_Guide
Installing the online shop (WooCommerce)
- If you wish to sell products please install WooCommerce (this should happen during the installation wizard)
- Go to WooCommerce > Settings and configure your preferences
- Further details about installing and using WooCommerce are available here:
http://docs.woothemes.com/document/woocommerce/
- Further help and support for using WooCommerce is available here:
http://www.woothemes.com/woocommerce/
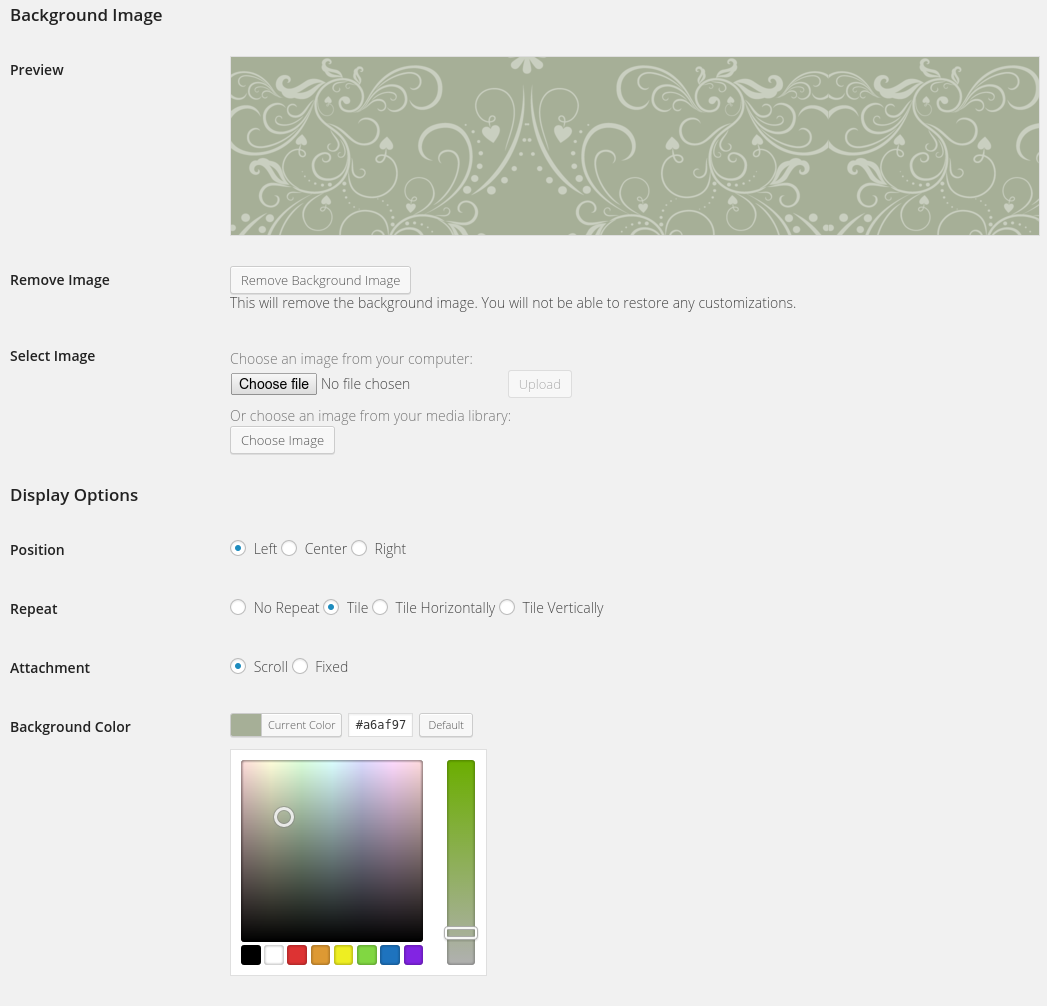
Background Images / Colors
Note: some graphical elements have been designed to only work with the default background image. So a change of background image may cause some inside design elements to not look nice. Additional graphical modifications may need to be made after changing the default background.
- If you wish to change the default background image:
- Go to Appearance > Background
- Go to “Choose an Image from your Computer” and choose the background image you would like to use.
- Adjust the colors and background settings to suit your needs.
Insert Styled Image
This theme comes with a really cool and unique styled image selector. When inserting an image to a page/post you have the option to choose the image style. See this video for an example:
Columns
Adding columns to your page is very easy. Simply edit the page/post and click the “Columns” button. See this video for an example:
Columns can also be styled, choose the style from the drop down list.
Included Widgets
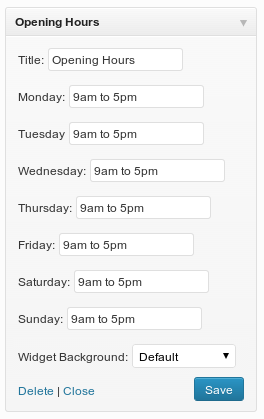
- Opening Hours Widget:
Useful for placing on the Contact Us page.
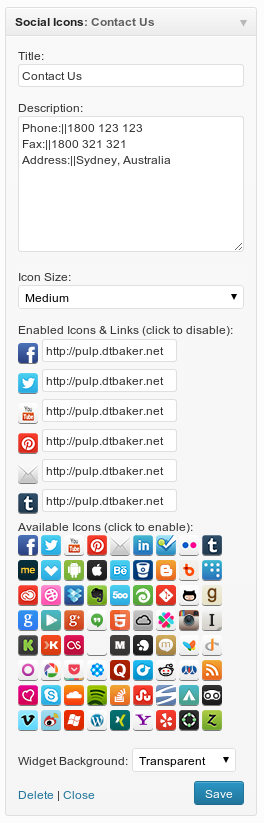
- Social Icons Widget:
Here are the social icons included within this widget:
- Google Map:
Useful for the contact page or the footer widget area.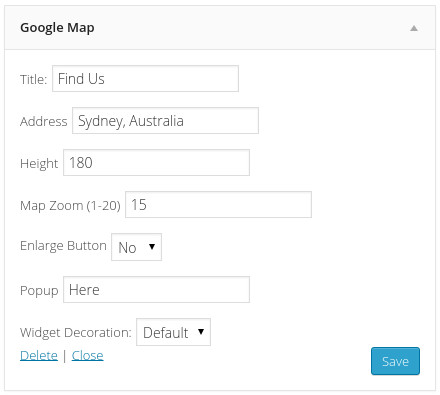
Widget Decorations
You can change the background color of any Widget within this theme using the easy drop down menu in Appearance >
Widgets.
Hint: use the “default” background option for footer widgets.
Changing widget backgrounds can be done like in this video:
Widgets Positions / Sidebars
The Widgets and Sidebars in this theme are handled by the “Widget Area Manager” plugin.
To view all available widget areas (header/sidebar/footer) please see the demo.
You can change the position of some of the widget areas using the “Left/Right Column”, “Header” and “Footer” menu items displayed in the admin bar:
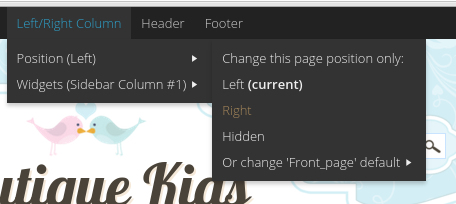
Here is a video showing changing the position of the sidebar widgets:
Translations
Please try installing the free plugin called Loco Translate. Once installed go to the Loco Translate menu, then choose Themes, then choose the theme, then click "New Language" and follow the prompts.
Alternatively, the WordPress POT file for this theme is available in the /languages/ folder of the theme zip file. Instructions on translating WordPress themes with POT file are available here: https://poedit.net/wordpress
Photoshop Files
Photoshop files are available from this special URL after purchasing this theme: http://dtbaker.net/files/envato/resources/. Please login with your Envato account to access the latest version of the purchased resources.Fonts:
The fonts used are from google fonts online library.
- Logo: Indie Flower (https://www.google.com/fonts/specimen/Indie+Flower)
- Menu: Indie Flower (https://www.google.com/fonts/specimen/Indie+Flower)
- Titles: Indie Flower (https://www.google.com/fonts/specimen/Indie+Flower)
- Body font: Open Sans (https://www.google.com/fonts/specimen/Open+Sans)
- Icons: Font Awesome (https://fortawesome.github.io/Font-Awesome/)
Artwork:
The flowers and watercolour designs have been hand painted by our in-house artist. The artwork can be used as part of your branding on business cards, stationary, online presence, emails and alike. The artwork can not be removed from the design to be sold separately.
Photos:
The photos used in the design are under a royalty free, public domain licence and can be used by you for free. (released free of copyrights under Creative Commons CC0. You may download, modify, distribute, and use them royalty-free for anything you like, even in commercial applications. Attribution is not required.) They were sourced from here: https://pixabay.com/
Icons:
- To change the icons used in the example, download and install the font awesome font here (https://fortawesome.github.io/Font-Awesome/).
- Go to the "cheat sheet" page,
- find the icon you want to use,
- highlight the icon on the screen,
- right-click and copy it.
- Open photoshop,
- go to the the correct layer, for example the social icons.
- select the text tool and paste your icon. It should then appear.
- If you only see a square or nothing at all make sure the font on that layer is selected as "font Awesome".
Changing the logo:
Short version:
I have used a masking technique to create the textured look of the logo, here's how to change the text.
- Go to the "logo text" folder in Layers. (logo groups>logo text)
- Remove the mask on the folder
- Hide the texture & colour layer
- Change the text
- Add back the blank mask to the logo text folder
- Select the font layer, Hold control on your keyboard and click on the "T" on the text layer your company name is on. A selection will appear.
- Inverse the selection
- Apply the selection the the mask
Detailed version:
I have used a masking technique to create the textured look of the logo, here's how to change the text.
- Go to the "logo text" folder in Layers. (logo groups>logo text)
- You will see a black square on the layer, that's a mask, right click on it and select "delete layer mask".
- It looks messy now, that's ok, lets turn off the mess by hiding the colour and texture layers (click the eyes)
- Now the font is clearly visible, use the "type tool" to change the word beautiful to your company name.
- now click on the "logo text" folder, we are putting the mask back.
- Click "add layer mask"at the bottom of the layers pallet. A white square should appear.
- Turn back on the colour & texture layers so the mess reappears.
- Hold control on your keyboard and click on the "T" on the text layer your company name is on. A selection will appear.
- Go to "Select" in the top menu >Inverse
- Return to your white square and fill the selection with a black colour (hold alt and hit backspace).
- Your logo should now have the same effect as the original.
- You may need to make the colour & texture layers wider if you have a long name, you can adjust them at any time without removing the mask.
Changing the logo colour:
- Go to the "logo text" folder in Layers. (logo groups>logo text)
- Click on the "colour" layer
- Draw a rough square selection over your logo
- Fill it with the colour of your choice.
NOTE: a "layer style" colour overlay wont work as we are using a layer blending technique. The colour has to be directly on the layer.
Advanced Editing
Please consider using a Child Theme for any changes. This will help stop theme updates overwriting your customisations.
- CSS Files:
- A good way to override default theme CSS is to install a WordPress CSS plugin such as this one. This is a little easier than overwriting theme stylesheets for small changes.
- Here are the list of css files and a description of what they do:
- style.blog.css – the blog layout page and individual blog pages
- style.comments.css – the blog comments
- style.content.css – the inside content area. Images, text, boxes.
- style.custom.css – automatically generated, do not edit this file, see below dynamic stylesheet section for more details.
- style.css – overall page styles (sidebars, header, footer)
- style.editor.css – wordpress editor styles
- style.ie.css – old IE styles
- style.prettyPhoto.css – handles nice image popups in galleries
- style.responsive.css – tablet and mobile responsive css layout rules
- style.woocommerce.css – styles to override the default WooCommerce layout
- style.wpcf7.css – override the default contact form settings
- LESS Files:
- There are some LESS files that were used to generate the CSS files. If you are familiar with LESS then please feel free to use these files for editing the main CSS files. Otherwise simply edit the main CSS files and ignore the LESS files all together.
- Dynamic stylesheet: style.custom.css
This stylesheet is created and overwritten every time you click save in the theme “Customize” area
The file style.custom.php is used to generate the style.custom.css file, so feel free to modify the style.custom.php file if you need to change any of the automatically generated css rules.
The file dtbaker.theme_options.php contains some of the default custom styles listed at the top. This file also controls the wordpress customizer options if you need to make changes there. - Comments: the comment layout is controlled from functions.php under the function boutique_comment() – this can be overridden with a child theme
- If you would like to make an advanced change and cannot figure it out please send us an email. Although we are unable to perform any custom modifications for you we may be able to point you in the right direction. Changes outside of the “customize” area of this theme will require an advanced level of CSS, HTML and (possibly) PHP knowledge.
- We always recommend hiring a professional website editor from Envato Studio to assist with changes.
Changelog
Here is a list of theme changes:
-
Version: 1.6.24
Date: 2017-06-05
- WordPress 4.8 and other fixes
-
Version: 1.6.23
Date: 2017-04-24
- WordPress 4.7.4
-
Version: 1.6.22
Date: 2017-04-13
- WordPress 4.7.3 support
- WooCommerce 3 support
-
Version: 1.6.21
Date: 2017-02-01
- WordPress 4.7.2 support
- Fixed inserting widgets
-
Version: 1.6.20
Date: 2016-12-16
- Better default images
-
Version: 1.6.19
Date: 2016-12-14
- Improved setup wizard
-
Version: 1.6.18
Date: 2016-12-14
- WordPress 4.7 Support
- New graphics
-
Version: 1.6.17
Date: 2016-10-03
- Elementor page editor support added
- New page header options
- Cleaner graphics
-
Version: 1.6.16
Date: 2016-08-09
- Spotify Support Added
-
Version: 1.6.15
Date: 2016-06-23
- Fix for mobile drop down menu
-
Version: 1.6.14
Date: 2016-03-28
- Fix installer and updated bundled plugins
-
Version: 1.6.13
Date: 2016-03-03
- Fix woocommerce subcategory image thumb size
-
Version: 1.6.12
Date: 2016-02-21
- Updated bundled plugins.
- More hooks added
- Blog post full and summary output on home page.
- More options under Page Layout in Customizer
-
Version: 1.6.11
Date: 2016-02-08
- WordPress 4.4.2 Support
- Fix for WooCommerce buttons
-
Version: 1.6.10
Date: 2016-01-26
- Flower top/bottom style fix
-
Version: 1.6.9
Date: 2016-01-23
- Fix for banner button and images banner
-
Version: 1.6.8
Date: 2016-01-21
- CSS minification
- Fix for child theme compatibility
-
Version: 1.6.7
Date: 2016-01-19
- Fix for theme updates
- Fixed blue footer graphic
- Fix for changing theme colors
-
Version: 1.6.6
Date: 2016-01-14
- Fix for blog layout on small devices
-
Version: 1.6.5
Date: 2016-01-09
- Added grunt development toolchain
- Re-wrote core functions into class
- Plugin config and TGM via json array
-
Version: 1.6.4
Date: 2016-01-08
- Fix for theme updates
-
Version: 1.6.3
Date: 2016-01-07
- Building framework
-
Version: 1.6.2
Date: 2016-01-07
- Fixed 3rd party script prefixing
- Fixed dirname / basename usage
- Fixed get_template_directory when including/requiring
- Fixed correct translating